 For the last little while I have been immersing myself in family history again. This included printing up a couple of family trees as gifts. These printouts are getting quite big and were looking rather plain. I thought this time I’d like to decorate them with borders and flower motifs, rather like an illuminated manuscript. I guess I was thinking about that Book of Kells. With the miracle of computers and home printing I was able to accomplish this a lot quicker than the mediaeval monks; nowhere near as well of course, but I had a lot of fun with it. I was partly inspired to do this because I recently bought a large format printer and can now print up to 13 x 19 inches; so when building a tree I only have to glue together half the number of sheets as formerly.
I began by painting in watercolour a long narrow band of mixed tree leaves and fruits; some traditional species from the English woods of my boyhood. Holly, ivy, ash and oak. At this time of year I can’t bring in leafy oak and ash twigs, so I did those from memory, but we do have both holly and ivy growing in the garden, so I brought in bits of that to refer to. I made that band about 18 inches long so that it would print the entire length of a piece of 11 x 17 paper. Then I painted a corner section along the same lines. These border bands are 45mm (about 1¾ inches ) wide.
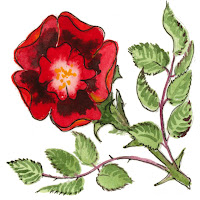
Then I painted five small stylized wildflowers to go into the various corners. In accordance with my ancestry, I chose the thistle for
I scanned in the results, and with some rather tricky and careful planning I managed to print the border elements onto the sheets upon which I had already printed the family tree data. It helps to be able to flip the border bands horizontally and vertically in Photoshop, and of course, rotate them as required. This not only fools the eye into thinking the pattern is not repetitive, but also assists in achieving a good matchup when ‘splicing’ one page to the next. By this means I was able to print fourteen running feet of border whilst only having to design and paint about three feet.
I have uploaded everything freely on Flickr as usual, so if you like to download the pieces and play around with them you can make printed frames as I did. These illustrations can of course easily be made to print smaller than I painted them. They will probably look even better that way. When you need to ‘splice’ two lengths of the band together, or a piece of band to the corner section, proceed as follows: when you are dragging one of the various pieces into a new ‘canvas’ for assembly, first select the white background of the piece (with a low tolerance, say 10). Then select ‘Inverse’. Your selection now consists of the entirety of the painted elements without the white background. Now drag it over with the ‘Move’ tool and overlay it onto a previous layer. It will appear ‘lacy’ – you can see through between the leaves and twigs to the layer beneath. This enables a perfectly natural splice which will be absolutely undetectable. Merge the visible layers when all is in place and you are satisfied.
1 comment:
Hi Andrew,
I've got your blog listed in my sidebar.... been hoping to see more of your beautiful art.
I see you haven't posted lately... hope everything is well with you.
Post a Comment